Skip to content

2019🔗

Getting Started With Python For Data Exploration

Intro

To get started with running python queries with SQL Server is actually pretty easy. I waited far too long to tackle this, thinking it was much harder than it turned out to be. Hopefully, this can be a good starting point for you as well.

Why would I want to do this?

When you use great tools like dbatools with PowerShell, you come to think that PowerShell is a first class citizen for working with SQL Server. This is true in regards to administration and general usage. However, data exploration is a different beast.

PowerShell & .NET Are Not Designed for Adhoc Data Exploration

First, can they? Yes. But just because there is a library someone created to give you some of these features, are the languages themselves first class data exploration languages, especially for adhoc and exploratory work. I think most would agree: no.

To be very clear, I know there are possibilities, such as the newer Azure Data Studio powershell notebook feature, and likely other modules that can help with exploration. What I'm trying to be clear about is that those are all exceptions to the rule, whereas exploration in Python is a first class citizen from the start. (coming from a dedicated PowerShell addict 😁)

Traditionally, I've used Azure Data Studio or SQL Management Studio and run individually queries in a large sql script to explore and manipulate the data. However, once you start wanting to pivot, aggregate, sum, and do various other experimental actions, T-SQL can be over complicated to do this for that adhoc work. Just because you can do unpivot doesn't mean it's a smarter use of time than using a pivot table in Excel for adhoc work (as much as it pains me to say).

{{< admonition type="info" title="Azure Data Studio" >}}

Azure data studio is making great progress with SQL Server based notebooks, which I highly recommend checking out. It's still in its infancy. So while it's pretty useful for basics, if you want to stick with a scripted approach to explore, python will be superior. Just recently PowerShell based code cells are available too, I believe.

{{< /admonition >}}

However, even better than playing around with data in an Excel sheet, what if you wanted to stay in your programmatic script and start slicing and dicing the data coming back, molding into "tidy data" for what you want to analyze?

PowerShell and .NET don't have the intuitive and experimental data exploration capabilities that have existed for a long time in the Python libraries. They can easily manipulate, group, mold and visualize the data with minimal effort. This is the forte of Python's libraries, and has much more maturity than doing some homegrown solution work around.

Jupyter Notebooks

I'm sticking with Visual Studio Code, so install the python extension ms-python.python and then create a new notebook directly from the command pallet. Once you open this up you can start writing some markdown notes and then running queries and visualizing the results in one place.

Python Plotly Library

The standard libraries are pretty good. I wanted something that also created graphs that I'd consider pleasing to the eye. The default matplotlib wasn't really what I was looking for, so I used plotly. This fantastic library has an express edition that gets you up and running in minutes playing with data, and can even convert your visualizations into a nice web app dashboard with Dash (also a plotly product).

Pandas

In addition to working with plotly I leveraged pandas. I think from my initial working with it, that this library will be a staple for my adhoc data work for a long time. It basically provides a nice easy way to work with Dataframes, which is kinda of like working with a .NET datatable, albeit, many extensibility, exporting, and other features built into it. I found it intuitive and pretty easy to work with.

Installing pyodbc

{{< admonition type="info" title="platform" >}}

This guide is written for someone using a Windows based development environment. The setup requirements for running in Linux/Mac will be different for drivers

For running in AWS Lambda in python runtime, there are more complex issues requiring the driver to be compiled and uploaded to a Lambda layer for use. Windows dev machine doesn't have this requirement and should just work after running ODBC driver install and pyodbc. 🎉

{{< /admonition >}}

  1. Link for SQL Server ODBC Drivers
  2. pip3 install pyodbc

Generate Connection File

If you are constantly changing the SQL Server instance you are connecting to, then you may just want provide variables for your script. In my test case, I wanted to create a default connection file that I could use in several scripts to avoid having to set in each module file.

I found some great examples online and cobbled this together from several.

import configparser
import keyring
import xlsxwriter

service_account = "DomainOfTheTaco\\TacoEater"
sql_login_name = "TACO-HIGH-PRIEST"
sql_instance = "TACO-SERVER-01"

driver_name = ''
driver_names = [x for x in pyodbc.drivers() if x.endswith(' for SQL Server')]
print("The following ODBC drivers were identified on your system")
print(driver_names)

if driver_names:
    driver_name = driver_names[0]
if driver_name:
    config = configparser.ConfigParser()
    config['SQL_SERVER'] = {
                            'DRIVER': driver_name,
                            'SERVER': sql_instance,
                            'DATABASE': "master",
                            'Trusted_Connection': 'yes',
                            "APP": "PythonTamer",
                            "UID": sql_login_name,
                            "PWD": keyring.get_password(service_account,service_account)
    }
    with open('db_connect.ini', 'w') as configfile:
        config.write(configfile)
else:
    print('(No suitable driver found. Cannot connect.)')

Since I had 2 versions of ODBC drivers available, this is what came up:

The following ODBC drivers were identified on your system
['ODBC Driver 13 for SQL Server', 'ODBC Driver 17 for SQL Server']

This generated a connection file I could use in other py files I wanted. The file generated in my user directory $ENV:USERPROFILE.

[SQL_SERVER]
driver = ODBC Driver 17 for SQL Server
server = TACO-SERVER-01
database = master
trusted_connection = yes
app = PythonTamer
uid = TACO-HIGH-PRIEST
pwd = redactedtacos

This could then be used in python files like below

import configparser
import pyodbc
import pandas

config = configparser.ConfigParser()
config.read('db_connect.ini')
constr = 'DRIVER={{{drv}}};SERVER={srv};DATABASE={db};Trusted_Connection={tc};APP={app};UID={uid};PWD={pwd}'\
              .format(drv=config['SQL_SERVER']['DRIVER'],
                      srv=config['SQL_SERVER']['SERVER'],
                      db=config['SQL_SERVER']['DATABASE'],
                      tc=config['SQL_SERVER']['Trusted_Connection'],
                      app=config['SQL_SERVER']['APP'],
                      uid=config['SQL_SERVER']['UID'],
                      pwd=config['SQL_SERVER']['PWD']
                      )

cnxn = pyodbc.connect(constr)

This connection object then would allow running queries similar to executing ADO.NET queries.

out_xlsx = "C://temp//python-sql-export.xlsx"
cnxn = pyodbc.connect(constr)
result = pd.read_sql("""
select
    name
from
    sys.databases
""",cnxn)
print(result)

print(f"Exporting to {out_xlsx}")
data_frame = pd.DataFrame(result)
data_frame.to_excel(out_xlsx, index = None, header=True)
print("finished query")

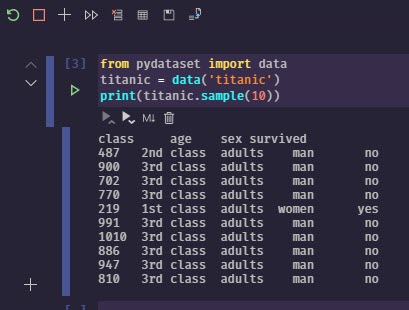
To sample in your notebook a few random entries, try this

data_frame.sample(n=20,random_state=1)

You should have an excel workbook exported after this. This was even more succinct than using ImportExcel PowerShell module which is my normal go to.

Group Results Into Ranges

import plotly.express as px

# How many results are being returned?
print(len(data_frame.value))

# These are the buckets I want to return results in
# Ie, how many of my results fit into the 0-250 range, and how many 500. These are not fixed ranges.
# Histograms do this type of work as well, I'm showing the grouping overriden at specific ranges with a dataframe in Pandas.

ranges = [0,250,500,1000,2000,3000,4000,5000,6000,7000,10000]
groupby = data_frame.groupby(pd.cut(data_frame.value, ranges)).count()
print(groupby)

# Plotly express visualization
fig = px.histogram(data_frame, x="time", y="value",title='MyFancyTitle')
fig.show()
               time  metric  value
value
(0, 250]       1652    1652   1652
(250, 500]       22      22     22
(500, 1000]      10      10     10
(1000, 2000]      9       9      9
(2000, 3000]      2       2      2
(3000, 4000]      1       1      1
(4000, 5000]      5       5      5
(5000, 6000]      9       9      9
(6000, 7000]      2       2      2
(7000, 10000]     1       1      1

This is pretty cool, as while you can do this with windowing functions in SQL Server, for adhoc work, I was able to do this in 2 lines. This could save a lot of time and debugging over more complex T-SQL procs.

Scatterchart

Never having really used scattercharts, I'm seeing in data exploration they can be a tremendously valuable tool.

print(len(data_frame.value))
fig = px.scatter(data_frame, x="metric", y="value",title='MyFancyTitle',size="value",render_mode="auto",marginal_y="rug",marginal_x="histogram")
fig.show()

Quick Example

pip3 install pydataset #optional for more than iris data
from pydataset import data
titanic = data('titanic')
print(titanic.sample(n=20,random_state=1))

This results in output like the image below

Notebook Output Sample for Titanic

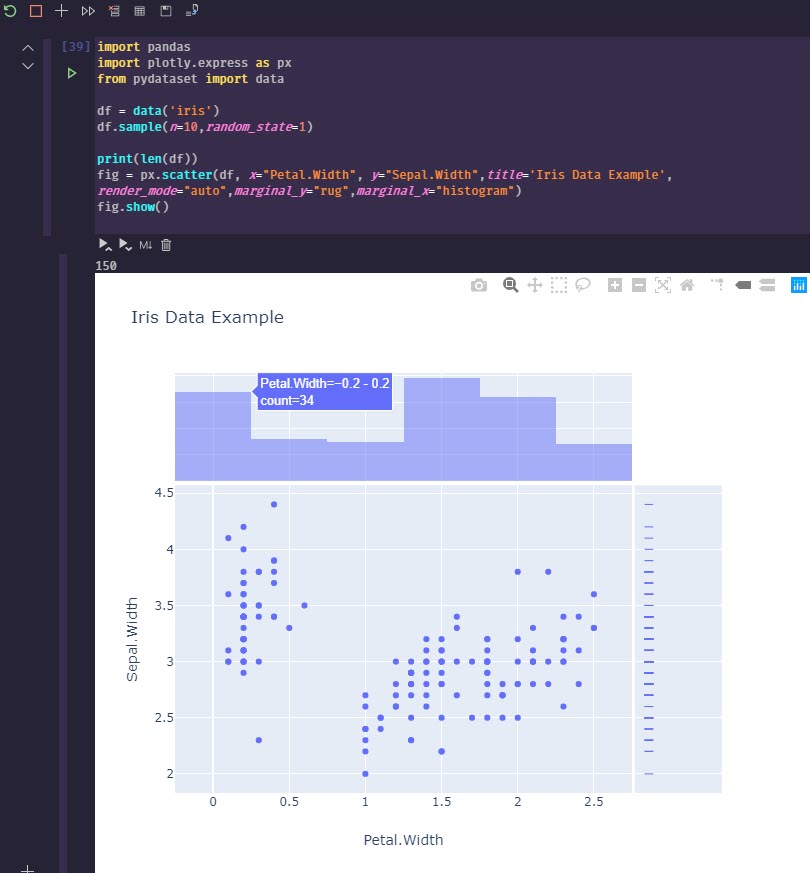
To generate a more advanced visualization, you can run something to visualize with plotly.

import pandas
import plotly.express as px
from pydataset import data

df = data('iris')
df.sample(n=10,random_state=1)

print(len(df))
fig = px.scatter(df, x="Petal.Width", y="Sepal.Width",title='Iris Data Example',render_mode="auto",marginal_y="rug",marginal_x="histogram")
fig.show()

Scatter Chart

Wrap Up

Lots of great options to visualize data with Python 😀 . I'll definitely be spending more time learning how to manipulate and query datasets with Python, and eventually give Dash by Plotly a try as well. I've enjoyed Grafana, but it's really meant for time series monitoring, not for the flexible data visualization options that can be done so easily in Python.

Hopefully, this gave you a good start on some of the benefits and ease of use of Python if you, like me, are coming from a PowerShell and SQL Server heavy background, and have wanted to know more about Python. 🌮

Improving the Quality of Your Automation Logging with Cowsay

Automation Taxes Your Sanity

You have to glue together systems with your amazing duct taped scripts.

You see failure after failure.

You want help predicting the success of your next run, so I'm going to provide you with an advanced artificially intelligent way to do this through the power of npm install.

NPM

npm install cowsay -g
npm install lucky -g
npm install catme -g
 _____________________________________
< Will my run succeed this time? Hmmm >
        \    ,-^-.
         \   !oYo!
          \ /./=\.\______
               ##        )\/\
                ||-----w||
                ||      ||

               Cowth Vader
 ________________________________________
< Will my run succeed this time? No way! >
 ----------------------------------------
   \
    \
     \
        __ \ / __
       /  \ | /  \
           \|/
       _.---v---.,_
      /            \  /\__/\
     /              \ \_  _/
     |__ @           |_/ /
      _/                /
      \       \__,     /
   ~~~~\~~~~~~~~~~~~~~`~~~

Now include the header in your script

"Will my run succeed this time? $( lucky --eightball)" | cowsay -r

Or spice up your console with a friendly cat using catme

 /\     /\
{  `---'  }
{  O   O  }
~~>  V  <~~
 \  \|/  /
  `-----'__
  /     \  `^\_
 {       }\ |\_\_   W
 |  \_/  |/ /  \_\_( )
  \__/  /(_E     \__/
    (  /
     MM
  /\ ___ /\
 (  o   o  )
  \  >#<  /
  /       \
 /         \       ^
|           |     //
 \         /    //
  ///  ///   --

There's a few PowerShell related one's, but I honestly just use other packages for this this.

Python

I just looked and found out there's a few great python equivalents so you could easily run some great stuff. They've got cowsay, a benedict cumberbatch like name generator, and more. I think I fell in love with Python a little bit more today.

Level Up

Level it up by installing lolcat and if running Cmder you'll enjoy the Skittlitizing of your console output.

PowerShell version is: Install-Module lolcat -Scope CurrentUser

"Will my run succeed this time? $( lucky --eightball)" | cowsay -r | lolcat

The resulting majesty:

CLI rendered dragon with lolcat

Linux Powerup

If you want to really wow your friends... just jump into bash inside windows and run from your cli. This is a level so far beyond the normal windows command line experience it might just make you uninstall windows and live purely on a Linux terminal for your remaining days.

This looks like a good background while waiting to start presentations 🚀

# first time if repos out of date
sudo apt update
sudo apt install cmatrix

cmatrix

Resources

{{< admonition type="warning" title="disclaimer" >}}

⚠ There are a couple ascii layouts that are a little inappropriate, so if doing a live demo or something more visible don't use random mode if you don't want something showing up that might embarass you 😁

{{< /admonition >}}

Getting Started With Terraform

{{< admonition type="info" title="Updated 2020-07" >}} - Added comments about brand new Terraform users ignoring Terraform Cloud for first time tests. - Added comment about pulling credentials using data source instead of environment variables for AWS as a more advanced option to consider in the future. - Replaced details on creating terraform credential file with the new tf login command {{< /admonition >}}

Getting started with using Terraform for infrastructure can be a bit daunting if you've not dived into this stuff before. I put this together as a write up for those looking to get their feet wet and have a better idea of where to go for getting some momentum in starting. There are some assumptions in this, such as basic familiarity with git for source control automation, basic command line usage, and basic cloud familiarity.

If time permits, I plan on writing up some more detailed walk through in future posts on Terraform iteration methods, object types, dynamic data inputs, and other things I've explored. However, what I've found is just getting the initial start seems to be a blocker for many people interested in trying it. Hopefully, this will give someone a head start on getting a basic plan going so they can understand how this works a little better and the other more detailed tutorials that abound will make more sense then. Give this post a clap or leave a comment if it helps you or you have any feedback. Cheers! :cheers:

Purpose of This Post

{{< admonition type="info" title="Using Terraform Cloud 2020-07" >}} If you are brand new to Terraform, then consider ignoring the "backend" section. This will have all the artifacts that Terraform produces (such as the state file) just sit in your local directory. In retrospect, Terraform Cloud intermixed with getting up and running as a new user might add more complication than required. {{< /admonition >}}

In technical documentation, there is a difference between a tutorial and a getting started. The getting started here is going to focus just on getting up and running, not on all the concepts about infrastructure as code. I found that just doing it the first time was the hardest thing. Terminology about modules and re-usability at the beginning of my efforts with Terraform went straight over my head as I couldn't fully wrap my understanding around how it would work. Now that I've gotten a lot more experience with Terraform for various projects, I've got some personal "best-practices" that I've found as well as insight from the community.

That's for another day 😁

Let's just make sure you can get up and running with a basic deployment Terraform deployment from the scratch.

I had minimal Cloudformation authoring experience, so this was new stuff to me at the time.

What about Cloudformation?

More knowledgeable people than me have written about this. I'll just say these personal subjective observations:

  1. Terraform is recognized for being a great tool in the industry, it's not some "indie open source project about to fail". Hashicorp has some serious vision.
  2. Just because you aren't going "cross provider" with Azure and AWS doesn't rule out Terraform. You aren't necessarily gaining anything special by "sticking with native" AWS CF, like you might think.
  3. Terraform's much more succinct, less prone to whitespace/indentation failures.
  4. IMO re-usability of Terraform provides itself to a better team collaborative experience.
  5. Terraform's preview of changes is more intuitive to me. Less nervous to deploy stuff.
  6. I just like HCL (Hashicorps DSL) better than writing YAML docs.
  7. If you are writing YAML without any generator... just why!

Resources

Links Description
Terraform Documentation Reference Terraform Documentation for CLI
Terraform Documentation For AWS Terraform AWS Provider Documentation

Setup

Installation and setup

Install chocolatey via command prompt as administrator

@"%SystemRoot%\System32\WindowsPowerShell\v1.0\powershell.exe" -NoProfile -InputFormat None -ExecutionPolicy Bypass -Command "iex ((New-Object System.Net.WebClient).DownloadString('https://chocolatey.org/install.ps1'))" && SET "PATH=%PATH%;%ALLUSERSPROFILE%\chocolatey\bin"

For macOS

brew cask install terraform

Terraform Cloud Setup

{{< admonition type="warning" title="Subscription" >}} This will require a Terraform Cloud account. At the time of this post they have a plan for around 5 users for free with a few features turned off. {{< /admonition >}}

Setup your Terraform App Account and make sure to enable 2FA.

Once you've been added, create a personal access token at your user settings (this is personal, not team based)

If you are using Terraform Cloud, run tf login to generate your local credential file to allow connecting to Terraform Cloud and easily using the registry and remote state workspaces provided.

Creating Your First Project

Create main.tf. It will be the first file you create.

Create provider.tf

{{< gist sheldonhull 95c3f9533b2111d7d9fa40ff90a917e3 "provider.tf" >}}

Create terraform.auto.tfvars

Note that if you try to create this file with the terraform.tfvars name, it won't work if using Terraform Cloud, as tfvars get generated dynamically from the variables setup in the Cloud workspace.

{{< gist sheldonhull 95c3f9533b2111d7d9fa40ff90a917e3 "terraform.auto.tfvars" >}}

Create variables.tf which is going to house all the input variables we want to declare.

{{< gist sheldonhull 95c3f9533b2111d7d9fa40ff90a917e3 "variables.tf" >}}

Create iam.tf which will provide a nice low risk resource to create that will show you how to use string interpolation for dynamic names in the most simple way, as well as the way to leverage EOT syntax to easily escape mutliline strings. However, if you see yourself doing this constantly, you might reevaluate your approach to ensure you are using objects and properties as much as possible and not just strings.

{{< gist sheldonhull 95c3f9533b2111d7d9fa40ff90a917e3 "iam.tf" >}}

{{< admonition type="info" title="HCL Multiline String Syntax" >}} If you use <<-EOT you get a nice little benefit that's not well documented. The - means it strings buffering whitespace for the following lines. This can allow you to keep your content indented and if you preface the first line with 6 spaces, then all the following lines trim 6 spaces as well to allow you to avoid a bunch of difficult to read string blocks. {{< /admonition >}}

You'll likely want to use a workspace with Terraform to organize this work, so instead of using the default, use the command

terraform workspace new qa

Terraform should select this new workspace by default. You can list the current workspaces using terraform workspace list and then select another one later if you wish by running terraform workspace select qa.

{{< admonition type="warning" title="Terraform Workspace Naming" >}} Personally, I'd recommend to not drive much of your naming or other configuration based on the workspace name, and instead use variables.

Terraform Cloud behavior with trying to use workspace names at the time of this post was not what I expected, so I ended up removing my dependency on workspace names being important for the configuration. See GitHub Issue

Instead, I use it as metadata only to organize the workspaces, not try to build configuration based heavily on using workspace name. {{< /admonition >}}

Deploying Infrastructure

Deploying is as simple as running terraform apply. You'll get a preview of the plan before apply, and then you can approve it to actually apply.

If You Connected This to Terraform Cloud

This is assuming you are running via Terraform Cloud. To run locally, you'll want to go to the workspace you created in Terraform Cloud and in the General Settings set to run locally instead of remote.

This means you'll be able to run the apply directly on your machine instead of running it from the remote location. Running remote is great, but for this to work you need to edit your Terraform remote cloud workspace and add the AWS access keys, as the job is actually running in the remote context and not using your local machine credentials.

{{< admonition type="info" title="Terraform Cloud Credentials" >}} My preferred solution for this is to setup another Terraform workspace to create the credentials and then call this datasource to provide me with access instead of having to configure environment variables per workspace. This is a more advanced operation and not required on your first go-round, but keep it in mind as you scale up to managing many workspaces later on. {{< /admonition >}}

Connecting your git repository to your Terraform workspace can also be done for automatically planning on commit. This forces changes to come through your git commits instead of being able to run locally, which can be great for ensuring source control truly is the equivalent of your release when working with a team.

Tearing Down Infrastructure

To tear down the infrastructure we just deployed, you can run: terraform destroy and approve the resulting preview it gives you.

If you are using Terraform Cloud, in order to destroy a remote workspace (by queuing the destroy then destroying the workspace fully), you'll need to ensure the environment variable is set in the remote workspace for CONFIRM_DESTROY = 1

Wrap up

Terraform documentation is pretty solid on all the provider resources, so you can normally copy and paste (or use vscode extension mentioned). Another great way to learn is to look at github and the various Terraform modules that have been published. You can see how they structure their code a bit better and learn from that as well.

If you are using Visual Studio Code, also download the Hashicorp Terraform extension for extra support.

Good luck! If any steps were unclear or confusing please put in a comment and I'll do my best to improve this for an initial on-boarding experience for a new Terraform user.

2019-09-26T14:10:42+00:00

You know you are a dad when you start looking at a minivan as a really cool vehicle and marvel at all the features that have zilch to do with driving. $35-40k for a glorified station wagon with sliding doors would probably make sane humans question reality, while #dadlife looks at sliding doors as less risk for door ding claims from his little rascals.

You know you have a researching mentality when you begin to investigate minivan prejudices impact in the market against widerspread adoption. #bunnytrail

2019-09-26T13:58:58+00:00

You know you probably reserved the wrong hotel when you drive around from the back and think it's a condemned building, only to come around the front and realize that's actually your reservation. Needless to say, that reservation got cancelled.

2019-09-26T14:04:40+00:00

I have a new term for the wait my daughter eats food. Instead of please stop wearing food all over your face and eat proper I'm going to label her: "An experiential tactile food lover"

Painless Synchronization of Azure Blob Storage with AWS S3

Synchronization

Moving data between two cloud providers can be painful, and require more provider scripting if doing api calls. For this, you can benefit from a tool that abstracts the calls into a seamless synchronization tool.

I've used RClone before when needing to deduplicate several terabytes of data in my own Google Drive, so I figured I'd see if it could help me sync up 25GB of json files from Azure to S3.

Very happy to report it worked perfectly, and with only a couple minutes of refamilarizing myself with the tool setup.

Install RClone

For windows users, it's as easy as leveraging Chocolatey and running

choco upgrade rclone -y

Setup Providers

Go through rclone config dialogue and setup your cloud provider. In my case, I setup Azure as a provider to connect to blob storage, and then AWS with s3.

{{< admonition type="info" title="Cloud to Cloud" >}} Providers that support cloud to cloud based calls without copying locally are provided in the section for Optional Features where you can view the operations that support calls {{< /admonition >}}

Initialize Sync

rclone copy azure:containername s3:bucketname/keyprefix --log-level ERROR --progress --dry-run

Wrap-up

Take a look at this if you need a simple way to grab some data from one provider and leverage in another and you might want to save yourself some time on learning provider specific api calls. I've found tools like this, Terraform, and others that help abstract the api calls can be a great resource as you can leverage one syntax to work with two completely different providers and eliminate a lot of effort in coding.

AWS SSM PowerShell Script Automation

SSM Overview

I've found that working with a large number of environments in AWS can provide some interesting challenges for performing various tasks, in a way that scale.

When you begin to have dozens to hundreds of servers that you might need to provide a quick fix, the last thing you want to do is RDP into each and perform some type of scripted action.

AWS SSM (Systems Manager) provides a tremendous amount of functionality to help manage systems. It can perform tasks from running a script, installing an application, and other mundane administrative oriented tasks, to more complex state management, AMI automation, and other tasks that might go beyond the boundaries of virtual machine management.

I'll probably be unpacking a few of these areas over the next few posts, since my world has been heavily focused on SSM usage in the last months, and leveraging it is a must for those working heavily with EC2.

PowerShell Execution

For the first simple example, AWS SSM provides documents that wrap up various scripted actions and accept parameters. This can be something like Joining a domain or running a shell script.

In my case, I've had the need to change a registry setting, restart a windows service, or set an environment variable across an environment. I additionally wanted to set the target of this run as a tag filter, instead of providing instanceid, since this environment is rebuilt often as part of development.

The commands to execute scripts have one flaw that I abhor. I hate escaping strings. This probably comes from my focused effort on mastering dynamic t-sql 💩, at which point I quickly tried to avoid using dynamic sql as much as possible as I realized it was not the end all solution I started to think it was when I just started learning it.

With PowerShell and AWS SSM things could get even messier. You'd have to pass in the command and hope all the json syntax and escaping didn't error things out.

The solution

Write PowerShell as natively designed, and then encode this scriptblock for passing as an encoded command. I've found for the majority of my adhoc work this provided a perfect solution to eliminate any concerns on having to escape my code, while still letting me write native PowerShell in my Vscode editor with full linting and syntax checks.

Authenticate

Import-Module AWSPowershell.NetCore, PSFramework #PSFramework is used for better config and logging. I include with any work i do
$ProfileName = 'taco'
$region = 'us-west-1'
Initialize-AWSDefaultConfiguration -ProfileName $ProfileName -region $region

Create Your Command

In this section, I've provided a way to reference an existing function so the remote instance can include this function in the local script execution rather than having to copy and paste it into your command block directly. DRY for the win.

#----------------------------------------------------------------------------#
#                  Include this function in remote command                   #
#----------------------------------------------------------------------------#
$FunctionGetAWSTags = Get-Content -Path 'C:\temp\Get-AWSTags.ps1' -Raw
$command = {
  Get-Service 'codedeployagent' | Restart-Service -Verbose
}

Now that you have a script block, you can work on encoding. This encoding will prevent you from needing to concern yourself with escaping quotes, and you were able to write your entire script in normal editor without issues in linting.

#----------------------------------------------------------------------------#
#                   encode command to avoid escape issues                    #
#----------------------------------------------------------------------------#
[string]$CommandString = [string]::Concat($FunctionGetAWSTags, "`n`n", $Command.ToString())
$bytes = [System.Text.Encoding]::Unicode.GetBytes($CommandString)
$encodedCommand = [Convert]::ToBase64String($bytes)
$decodedCommand = [System.Text.Encoding]::Unicode.GetString([System.Convert]::FromBase64String($encodedCommand));
Write-PSFMessage -Level Debug -Message "Decoded Command: $($DecodedCommand)"

In my local script, I'll also include this Wait-SSM command that's a quick way to wait for the results of the SSM job to finish and show status. This is because Send-SSMCommand is actually an asynchronous command and doesn't wait for completion, just the successful sending of the command.

function Wait-SSM
{
    param(
        [Amazon.SimpleSystemsManagement.Model.Command]$Result
    )
    end
    {
        $Status = (Get-SSMCommandInvocation -CommandId $Result.CommandId -Details $true | Select-Object -ExpandProperty CommandPlugins).Status.Value
        while ($status -ne 'Success')
        {
            $Status = (Get-SSMCommandInvocation -CommandId $Result.CommandId -Details $true | Select-Object -ExpandProperty CommandPlugins).Status.Value
            Start-Sleep -Seconds 5
        }
        Get-SSMCommandInvocation -CommandId $Result.CommandId -Details $true | Select-Object InstanceId, Status | Format-Table -Autosize -Wrap
    }
}

Send Command

Finally, we get to the meat 🍗 and potatos... or in my case I'd prefer the meat and tacos 🌮 of the matter.

Sending the command...

$Message = (Read-Host "Enter reason")
$sendSSMCommandSplat = @{
    Comment                                       = $Message
    DocumentName                                  = 'AWS-RunPowerShellScript'
    #InstanceIds                                  = $InstanceIds # 50 max limit
    Target                                        = @{Key="tag:env";Values=@("tacoland")}
    Parameter                                     = @{'commands' = "powershell.exe -nologo -noprofile -encodedcommand $encodedCommand"  }
    CloudWatchOutputConfig_CloudWatchLogGroupName  = 'ssm/manual/my-command'
    CloudWatchOutputConfig_CloudWatchOutputEnabled = $true
}
$result = Send-SSMCommand  @sendSSMCommandSplat
Wait-SSM -Result $result

Note that you can also pass in an instance list. To do this, I'd recommend first filtering down based on tags, then also filtering down to available to SSM for running the command to avoid running on instances that are not going to succed, such as instances that are off, or ssm is not running on.

To stream results from cloudwatch, try looking at my post: Post on Using Cw for Cloudwatch Log Stream In Terminal

cw tail -f --profile=my-profile --region=eu-west-1 'ssm/manual/my-command'

EC2 Filters

To simplify working with tags, I often use the ConvertTo-Ec2Filter function that was written by David Christian (@dchristian3188) and can be viewed on this blog post EC2 Tags and Filtering.

Function ConvertTo-EC2Filter
{
    [CmdletBinding()]
    Param(
        [Parameter(
            ValueFromPipeline,
            ValueFromPipelineByPropertyName)]
        [HashTable]
        $Filter
    )
    Begin
    {
        $ec2Filter = @()
    }
    Process
    {
        $ec2Filter = Foreach ($key in $Filter.Keys)
        {
            @{
                name   = $key
                values = $Filter[$key]
            }
        }
    }
    End
    {
        $ec2Filter
    }
}
$searchFor = @{
    'tag:toppings'   = 'saucesAndMoreSauces'
    'tag:env'        = 'tacoland'
}


$ssmInstanceinfo        = Get-SSMInstanceInformation
$ec2Filter              = ConvertTo-EC2Filter -Filter $searchFor
$Instances              = @(Get-EC2Instance -Filter $ec2Filter).Instances
[string[]]$InstanceIds  = ($Instances | Where-Object { $_.State.Name -eq 'running' -and $_.InstanceId -in $ssmInstanceinfo.InstanceId } | Select-Object InstanceId -Unique).InstanceId

wrap-up

Hopefully this will get you going with Send-SSMCommand in a way that helps give you a simple way to issue commands across any number of EC2 instances. For me, it's saved a lot of manual console work to run commands against tagged environments, allowing me to more rapidly apply a fix or chocolatey package, or any number of needs in the context of testing, without all the overhead of doing per instances, or use the dreaded RDP 💩 connection.

If you find something unclear or worth more explanation, I'm always up for editing and refactoring this post. 🎉

Bump nuspec file version with powershell

Bump Nuspec Version

Bumping the version of the nuspec file requires a little tweaking and I got some help from the slack powershell community to ensure I handled the xml parsing correctly. This was the result. If you are running a chocolatey package build or equivalent nuspec build via an agent and want a way to ensure the latest build updates the build version incrementally this should help.

This snippet should help give you a way to bump a nuspec file version programmatically.

I modified the logic to support -WhatIf since I'm a fan of being able to run stuff like this without actually breaking things first.

Use Case

Leveraging aws system manager sessions can help with aws development, by eliminating the need to RDP for work that can be done via a PowerShell session. In addition, it can help bypass the need to use SSH tunneling, remote Windows management, or RDP hops into the final destination.

This leverages IAM Credentials, allowing consistent security management in alignment with other IAM policies, instead of having to manage another security setting like remote management would require, potentially reducing the security explore footprint.

  • Quickly access an instance that normally would require an additional hop, and then evaluate
  • Restart remote service without having to hop into it (or issue SSM prebuilt command docs)
  • Interact in other ways that are more adhoc in nature, and don't have prebuilt SSM Documents ready to go.

Browser

This is a great option for leveraging AWS Systems Manager web console. When you select start a session you'll be presented with the tagged instances by name that you can quickly select and start a remote session with.

Select Instances to Start Session Against

Start Session

Once you've started the session you'll enter into a remote prompt.

Interactive PowerShell Prompt on Remote Instance

Local Interactive Setup

I use Cmder for my main terminal, with all other terminals normally running in Visual Studio Code. If you open a Powershell session using the powershell plugin you can write your PowerShell in the editor, and the interactively run it in Visual Studio Code using the predefined F8 key.

Install on Windows

Ensure your AWS Credentials are setup, and use the session manager plugin after installation by running:

Start Session

aws ssm start-session --target MyInstanceId

Limitations

Refresh rate is slow. Input for large script blocks from Visual Studio Code is also really slow. This means that putting a local function in scope by running F8 against it and then wanting to run this function interactively can take a while.

The best use case I see is for adhoc administrative or investigative work. If larger scripts are required, then having a script setup to install module or copy from s3 would be a much more performance solution, as it wouldn't require large amounts of console text streaming.