Skip to content

postsπŸ”—

Go R1 Day 35

progress

  • Worked with Taskflow a bit more.
  • Need to identify better error handling pattern on when to resolve vs handle internal to a function, as it feels like I'm doing needless error checking.
  • Wrote func to run terraform init, plan, and apply.
  • This takes dynamical inputs for vars and backend file.
  • Also dynamically switches terraform versions by running tfswitch.

Definitely more verbose code than powershell, but it's a good way to get used to Go while achieving some useful automation tasks I need to do.

Example of some code for checking terraform path.

func terraformPath(tf *taskflow.TF) (terraformPath string, err error) {
    terraformPath = path.Join(toolsDir, "terraform")
    if _, err := os.Stat(terraformPath); os.IsNotExist(err) {
        tf.Errorf("❗ cannot find terraform at: [%s] -> [%v]", terraformPath, err)
        return "", err
    }
    tf.Logf("βœ… found terraform at: [%s]", terraformPath)
    return terraformPath, nil
}
terraformPath, err := terraformPath(tf)
if err != nil {
  tf.Errorf("❗ unable to proceed due to not finding terraform installed [%v]", err)
  return
}

However, once I call this, I'm see more effort in handling, which feels like I'm double double work at times.

Go R1 Day 34

progress

  • figured out how to import util/logger.go as a package
  • after much confusion due to logger, log, *zerolog.Logger and more variables all deviously similar in name... how to pass around the initialized package logger that I configure.
  • learned that global scope and package scoped loggers being initialized at run is concerned an anti-pattern
  • properly wrapping to avoid the log initialization on import with type Logger struct { logger: *zerolog.Logger; } as an example avoids the same behavior as: var Log *zerolog.Logger
  • will evaluate better scoping in the future, but for now figured it would be a πŸš€ #shipit moment to improve as I can later. 1

Go R1 Day 33

progress

  • successfully created logging package using zerolog
  • learned about scoping with packages
  • linked to a private internal repository and how to leverage the module replace operator to temporarily alter path import from url to local override.
  • middleware is a newer concept, so I need to learn more on this later so I can understand how to use to inject special log handling for http requests and other actions.

Thoughts for today are that the pressure of jumping into an existing codebase is resulting in me moving faster than I probably should. I'm going to take some time to keep doing the web fundamentals, lambda, and exercisms to ensure I'm setting a better foundation long-term, and not just winging it. πŸ˜„

Go R1 Day 32

progress

  • created some structured logging improvements with zerolog
  • began exploration of middleware concepts for logging
  • generated test stubs using gotests

Go R1 Day 31

progress

  • Learned a bit about idiomatic patterns wtih error handling.
  • Learned about inline block intiailization of variables using if err := method(); err != nil {...} approach.
  • Considered a bit more idiomatic patterns when I noticed excessibe nested if blocks.
tfdir := tf.Params().String("tfdir")
if tfdir != "" {
  tf.Logf("tfdir set to: [%s]", tfdir)
} else {
  tf.Errorf("πŸ§ͺ failed to get tfdir parameter: [%v]", tfdir)
}

This would probably be more in alignment with Go standards by writing as:

tfdir := tf.Params().String("tfdir")
if tfdir == "" {
  tf.Errorf("πŸ§ͺ failed to get tfdir parameter: [%v]", tfdir)
  return
}
tf.Logf("tfdir set to: [%s]", tfdir)

This reduces the noise and keeps things pretty flat.

When Should I Use One Liner if...else Statements in Go?)

Go R1 Day 30

progress

  • Built some go functions for build tasks work with terraform and setup of projects using taskflow.

Learned one one to pass in arguments using slices. I'm pretty sure you can use some stringbuilder type functionality to get similar behavior, but this worked fine for my use case.

cmdParams := []string{}
cmdParams = append(cmdParams, "-chdir="+tfdir)
cmdParams = append(cmdParams, "init")
cmdParams = append(cmdParams, "-input=false")
cmdParams = append(cmdParams, "-backend=true")
cmdParams = append(cmdParams, "-backend-config="+tfconfig)
terraformCmd := tf.Cmd(terraformPath, cmdParams...)
if err := terraformCmd.Run(); err != nil {
  tf.Errorf("β­• terraform init failed: [%v]", err)
  return
}

Go R1 Day 29

progress

  • Evaluated Mage as a replacement for bash/pwsh based tasks for automation with Azure Pipelines.
  • Was able to get terraform to run with dynamic configuration using the following approach:

Install with

go get -u github.com/magefile/mage/mg
go mod init mage-build
go get github.com/magefile/mage/mg
go get github.com/magefile/mage/sh
go mod tidy

Then to get mage-select run:

GO111MODULE=off go get github.com/iwittkau/mage-select
cd $GOPATH/src/github.com/iwittkau/mage-select
mage install

Configure some constants, which I'd probably do differently later. For now, this is a good rough start.

const (
    repo          = "myrepopath"
    name          = "myreponame"
    buildImage    = "mcr.microsoft.com/vscode/devcontainers/base:0-focal"
    terraformDir  = "terraform/stack"
    config_import = "qa.config"
)
func TerraformInit() error {
    params := []string{"-chdir=" + terraformDir}
    params = append(params, "init")
    params = append(params, "-input=false")
    params = append(params, "-var", "config_import="+config_import+".yml")

    // Backend location configuration only changes during the init phase, so you do not need to provide this to each command thereafter
    // https://github.com/hashicorp/terraform/pull/20428#issuecomment-470674564
    params = append(params, "-backend-config=./"+config_import+".tfvars")
    fmt.Println("starting terraform init")
    err := sh.RunV("terraform", params...)
    if err != nil {
        return err
    }
    return nil
}

Once terraform was initialized, it could be planned.

func TerraformPlan() error {
    mg.Deps(TerraformInit)
    params := []string{"-chdir=" + terraformDir}
    params = append(params, "plan")
    params = append(params, "-input=false")
    params = append(params, "-var", "config_import="+config_import+".yml")
    fmt.Println("starting terraform plan")
    err := sh.RunV("terraform", params...)
    if err != nil {
        return err
    }
    return nil
}
  • Of interest as well was mage-select, providing a new gui option for easier running by others joining a project.

mages-select-on-console

Fix Terraform Provider Path in State

Fixing Terraform provider paths in state might be required after upgrading to 0.13-0.14 if your prior state has the following paths.

First, get the terraform providers from state using: terraform providers

The output should look similar to this:

image-of-providers

To fix these, try running the commands to fix state. Please adjust to the required providers your state uses, and make sure your tooling has a backup of the state file in case something goes wrong. Terraform Cloud should have this backed up automatically if it's your backend.

terraform state replace-provider -- registry.terraform.io/-/aws registry.terraform.io/hashicorp/aws
terraform state replace-provider -- registry.terraform.io/-/random registry.terraform.io/hashicorp/random
terraform state replace-provider -- registry.terraform.io/-/null registry.terraform.io/hashicorp/null
terraform state replace-provider -- registry.terraform.io/-/azuredevops registry.terraform.io/microsoft/azuredevops

The resulting changes can be seen when running terraform providers and seeing the dash is now gone.

image-of-providers-changed

Upgrading to Terraform v0.13 - Terraform by HashiCorp

{{< admonition type="Example" title="Loop" open="false">}}

If you have multiple workspaces in the same folder, you'll have to run fix on their seperate state files.

This is an example of a quick adhoc loop with PowerShell to make this a bit quicker, using tfswitch cli tool.

tf workspace list | ForEach-Object {
    $workspace = $_.Replace('*','').Trim()
    Write-Build Green "Selecting workspace: $workspace"
    tf workspace select $workspace
    tfswitch 0.13.5
    tf 013.upgrade
    tfswitch
    tf init
    # Only use autoapprove once you are confident of these changes
    terraform state replace-provider -auto-approve -- registry.terraform.io/-/aws registry.terraform.io/hashicorp/aws
    terraform state replace-provider -auto-approve -- registry.terraform.io/-/random registry.terraform.io/hashicorp/random
    terraform state replace-provider -auto-approve -- registry.terraform.io/-/null registry.terraform.io/hashicorp/null
    terraform state replace-provider -auto-approve -- registry.terraform.io/-/azuredevops registry.terraform.io/microsoft/azuredevops
    tf validate
}

{{< /admonition >}}

Azure Pipelines Template Iteration

Templates

This isn't meant to be an exhaustive template overview. I'm just going to give an example of what I found useful as I've been meaning to leverage templates for a while and finally got around to having a great use for it.

My Use Case

I am a heavy user of InvokeBuild. It's a very robust task runner tool that I've used to coordinate many project oriented actions, similar to Make, but also DevOps oriented work like AWS SSM tasks and more.

In this scenario, I needed to run a query across: multiple queries -> across multiple servers -> across hundreds of databases --> and finally produce a single jsonl artifact3

Originally, I did this in a single Invoke-Build task, but what I discovered was with a long running job I wanted to have a bit more granular view of the progress and percentage complete. This also helped me visualize a bit more what specific queries cost the most in time.

Azure Pipeline Construction

I've extracted out the key essential pieces here to explain the core concepts.

Build Number

Build name is dynamically generated. This is my standard format for most pipelines, but you can adjust the naming with parameters (which are a compile time, before runtime) as well to add other descriptive values.

name: $(BuildDefinitionName).$(Configuration).$(Build.QueuedBy).$(DayOfYear)$(Rev:.r)

{{< admonition type="Info" title="Parameters" open="false">}}

Parameters are evaluated at compile time, rather than during the build run phase.

This means you can use something like the example below to update the queued build name on run.

name: $(BuildDefinitionName).$(Configuration).$(Build.QueuedBy).${{ parameters.SELECTED_VALUE }}.$(DayOfYear)$(Rev:.r)

Using a build variable might require updating the build name if the build variable isn't set on queue, as it won't pick it up without this command.

{{< /admonition >}}

Trigger

Setting the following values ensures this is a manual pipeline. Otherwise, once the pipeline is linked it would automatically trigger on PR and main branch commits.

There's other customization in terms of filtering triggers based on the path of the changed file, branch names, batching changes with multiple commits, and more in the docs.

trigger: none
pr: none

Parameters

Designed for user input, the parameters provide a good experience in customizing runs easily at queue time.

This can be a full yaml defined object, but my examples here are the simple ones.

parameters:
  - name: Configuration
    type: string
    default: qa
    values:
      - qa
      - prod
  - name: QUERY_NAME
    type: string
    default: 'no-override'
    displayName: If no-override, then run everything, else specify a specific query to run.
  - name: SERVER_LIST
    type: string
    default: 'tcp:123.123.123.1;tcp:123.123.123.2' #split this in the task code
    displayName: Example Input that InvokeBuild would split to array

Variables

Parameters won't be set in the environment variables, so if you want these exposed to the next tasks, you have to set the variable from the parameter.

This command will now mean the tasks run will have a $ENV:CONFIGURATION set automatically.

variables:
  - name: CONFIGURATION
    value: ${{ parameters.Configuration }}

Job

The pipelines allow you to only put the level of complexity you need in your runbook.

This means if you just have tasks, you can put those, but if you have a deployment job then you can include tasks in the appropriate child section.

For my default template here I like control of multi-stage yaml builds, so I use the following format.

jobs:
  - deployment: my-query-runbook
    displayName: Run Query in ${{ parameters.Configuration }}
    timeoutInMinutes: 480
    continueOnError: false
    environment: 'my-environment-${{ parameters.Configuration }}'  #could setup approval requirements for environments by specifying a name like `my-environment-prod` requires manual approval or is limited to specific folks
    pool:
      name: my-own-internal-agent  # OR use hosted container config if you want
      demands:
        - agent.os -equals Windows_NT  # OR use Ubuntu if you have linux container. This is customizable to help you filter to desired agent if working with private subnets etc.
        - env -equals ${{ parameters.Configuration }}
    strategy:
      runOnce:
        deploy:
          steps:
            - checkout: self
              persistCredentials: true
              fetchDepth: 0  # Unlimited in case you need more history
              clean: false
            - task: printAllVariables@1

Using the Template

At the same level as the task, the template can be called.

            - template: templates/run-query.yml
              parameters:
                SERVER_LIST: ${{ parameters.QUERY_NAME}}
                ${{ if ne(parameters.QUERY_NAME,'no-override') }}:
                  querynames:
                    - '${{ parameters.QUERY_NAME }}'
                ${{ if eq(parameters.QUERY_NAME,'no-override') }}:
                  querynames:
                    - 'Query1'
                    - 'Query2'
                    - 'Query3'

A few concepts to unpack:

  • Parameters must be passed into the template, as any build variables automatically in scope.
  • Variable reuse 6 has it's own set of quirks with templates.

Within a template expression, you have access to the parameters context that contains the values of parameters passed in. Additionally, you have access to the variables context that contains all the variables specified in the YAML file plus many of the predefined variables (noted on each variable in that topic). Importantly, it doesn't have runtime variables such as those stored on the pipeline or given when you start a run. Template expansion happens very early in the run, so those variables aren't available. 4

  • Expressions allow some conditional evaluation and change in behavior of the pipeline.5

Template Structure

parameters:
  - name: 'QUERY_NAME'
    type: object
    default: {}
  - name: 'CONFIGURATION'
    type: string
  - name: 'SERVER_LIST'
    type: string

Now that we have the parameters defined, we can use a steps block and loop on the QUERY_NAME parameter that could be a single or multiple entry input.

steps:
  - ${{ each query in parameters.QUERY_NAME }}:
      - task: PowerShell@2
        displayName: Query ${{ query }}
        inputs:
          targetType: inline
          script: |
            &./build.ps1 -Tasks 'run-my-query' -Configuration '${{ parameters.CONFIGURATION }}' -QueryName '${{ query }}'
          errorActionPreference: 'Stop'
          pwsh: true
          failOnStderr: true
          workingDirectory: $(Build.SourcesDirectory)
        env:
          OPTIONAL_ENV_VARS: ${{ parameters.EXAMPLE }}

This could also be slightly altered if you don't want inline scripts to use the following.

filePath: build.ps1
argumentList: "-Tasks 'run-my-query' -Configuration '${{ parameters.CONFIGURATION }}' -QueryName '${{ query }}'"

Reporting Progress

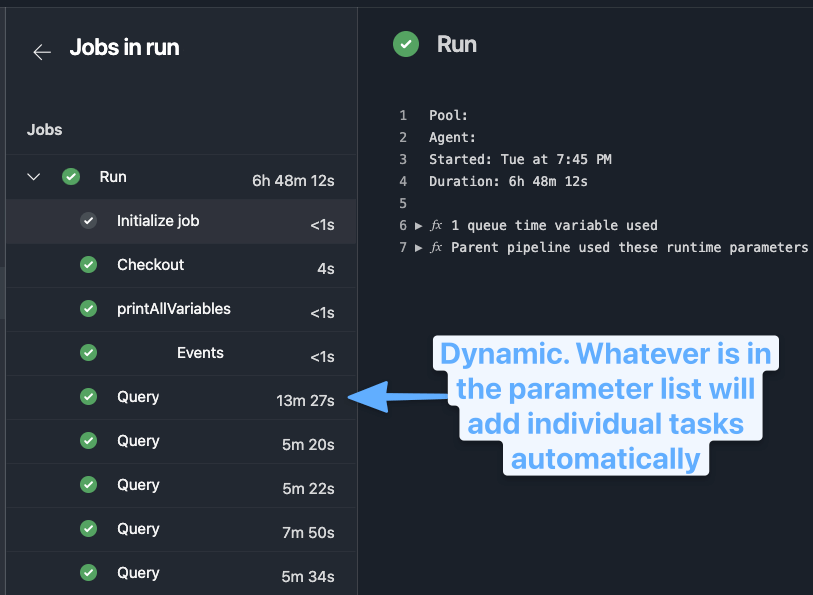
As the task runs, you can output percent complete so that your task shows how far along it is. I find this great for long running tasks, helping me check on them and know it's not stuck.

Write-Host "##vso[task.setprogress value=$PercentComplete;]MyTask"

Final Result

This allows the job to set dynamically the individual tasks to run, report progress on each, and log the timing.

While it could be run as a single task, I prefer this type of approach because a long running job is now much more easily tracked as it progresses.

image-of-individual-tasks-in-pipeline

Further Features

Templates allow for a wide range of usage and flexibility that I've barely touched. Selecting entire sets of tasks at runtime, variable sets, and more are all available.

This was a first round usage of them, as I really want to leverage the potentional for DRY with pipelines more, and templates offer a really flexible option to reusing core code across multiple pipelines without having to version each individually and try to keep them up to date.

More Resources

Git Workflow With Git Town

Resources

Git-Town

Painful But Powerful

Let's get this out of the way.

Git isn't intuitive.

It has quite a bit of a learning curve.

However, with this flexibility comes great flexibility. This tool has powered so much of modern open-source development.

Optimize for the Pain

To improve the development experience some tools can help provide structure.

This won't be an attempt to compare every git GUI, or push any specific tooling. It's more sharing my experience and what I've found helps accelerate my usage.

Tools I've Relied On

I'm not going to go into full detail on each, but check these out to help expedite your workflow.

The Challenge In Keeping Up To Date With Main

I use what's normally called trunk-based development. This entails regularly moving commits from branches into the main branch, often rebasing while maintaining it in a functional state.

I'll create a feature branch, bug fix, or refactor branch and then merge this to main as soon as functional.

I prefer a rebase approach on my branches, and when many ci/fix type commits, to squash this into a single unit of work as the results of the PR. This can result in "merge hell" as you try rebase on a busy repo.

Enter Git Town

This tool solves so many of the basic workflow issues, that it's become one of the most impactful tools to my daily work.

{{< admonition type="Tip" title="Enable Aliases" closed=false >}} The examples that follow use git sync, git hack feat/new-feature, etc as examples because I've run the command git-town alias true which enables the alias configuration for git town, reducing verbosity. Instead of git town sync, you can run git sync. {{< /admonition >}}

Example 1: Create a Branch for a New Unit of Work While You Are Already On Another Branch

Normally this would require:

  1. Stash/Push current work
  2. Checkout master
  3. Fetch latest and pull with rebase
  4. Resolve any conflicts from rebase
  5. Create the new branch from main
  6. Switch to the new branch

With Git Town

  1. git hack feat/new-feature

Example 2: Sync Main

The following steps would be performed by: git sync

[master] git fetch --prune --tags
[master] git add -A
[master] git stash
[master] git rebase origin/master
[master] git push --tags
[master] git stash pop

Example 3: New Branch From Main

Easy to quickly ensure you are up to date with remote and generate a new branch with your current uncommitted changes.

git town hack fix/quick-fix
[master] git fetch --prune --tags
[master] git add -A
[master] git stash
[master] git rebase origin/master
[master] git branch feat/demo-feature master
[master] git checkout feat/demo-feature
[feat/demo-feature] git stash pop

Example 4: Quickly Create a PR While On A Branch for Seperate Set of Changes

This workflow is far too tedious to do without tooling like this.

Let's say I'm on a branch doing some work, and then I recognize that another bug, doc improvements, or other change unrelated to my current work would be good to submit.

With git town, it's as simple as:

git town hack feat/improve-docs

I can stage individual lines using VSCode for this fix if I want to, and then after committing:

[feat/demo-feature] git fetch --prune --tags
[feat/demo-feature] git add -A
[feat/demo-feature] git stash
[feat/demo-feature] git checkout master
[master] git rebase origin/master
[master] git branch feat/demo-feature-2 master
[master] git checkout feat/demo-feature-2
[feat/demo-feature-2] git stash pop
git town new-pull-request

Example 5: Ship It

When not using a PR-driven workflow, such as solo projects, then you can still branch and get your work over to main to keep a cleaner history with:

git town ship

This command ensures all the sync features are run, while then initiating a squash of your branch, allow you to edit the squash message, rebase merge this onto main, and finally clean-up the stale branch.

More Examples

Check out the documentation from the creators: Git Town Tutorials

Other Cool Features

  • Automatically prune stale branches after PR merge when syncing
  • Handles perennial branches if you are using Git Flow methodology.
  • Extensible for other git providers.
  • Rename a local branch + remote branch in a single command
  • Handles a lot of edge cases and failures

Wrap-Up

When using git, leveraging some tooling like this can accelerate your workflow. I don't think you need to be an expert in git to use this, as it helps simplify many workflows that are just too tedious to be diligent on when running manually.

You can also do much of this with git aliases, but Git Town has a pretty robust feature-set with a testing framework in place, edge condition handling, and it's fast. Consider using it you'd like to improve your git workflow while simplifying all the effort to do it right.

  • [Git Hub Desktop Quick Look]2021-06-18-git-hub-desktop-quick-look/)
    • Update from main already built in. This is fantastic, and I can see how this provides a UI to do something similar to Git Town which I blogged on earlier here: [2021-02-23-git-workflow-with-git-town]2021-02-23-git-workflow-with-git-town/)