Skip to content

posts🔗

Go R1 Day 28

progress

  • Solved [Hamming Distance] on exercism.io
  • Simple problem, but reminded me of how to use string split.
diffCount := 0
aString := strings.Split(a, "")
bString := strings.Split(b, "")

for i, x := range aString {
  if x != bString[i] {
    diffCount++
  }
}
  • Reviewed other solutions, and found my first attempt to split the string wasn't necessary. Looks like I can just iterate on the string directly. I skipped this as it failed the first time. The error is: invalid operation: x != b[i] (mismatched types rune and byte).

This threw me for a loop initially, as I'm familar with .NET char datatype.

Golang doesn't have a char data type. It uses byte and rune to represent character values. The byte data type represents ASCII characters and the rune data type represents a more broader set of Unicode characters that are encoded in UTF-8 format. Go Data Types

Explictly casting the data types solved the error. This would be flexibly for UTF8 special characters.

for i, x := range a {
  if rune(x) != rune(b[i]) {
    diffCount++
  }
}

With this simple test case, it's it's subjective if I'd need rune instead of just the plain ascii byte, so I finalized my solution with byte(x) instead.

for i, x := range a {
  if byte(x) != byte(b[i]) {
    diffCount++
  }
}

Incremental and Consistent

It's really hard to prioritize when life gets busy, but it's important that continued improvement is a priority. Great at Work: How Top Performers Do Less, Work Better, and Achieve More was a really interesting book. The fact that small incremental improvement done daily can make such a difference is pretty interesting. It's similar to Agile tenets in how to approach software design. Smaller iterations with rapid feedback is better than large isolated batches work delivered without regular feedback. If you find yourself saying, "But I don't have time" or "When I have some time" it might be indicative of a failure to grasp this. When I catch myself saying this I try to reword it and say "Whenever I make time for this" instead. You'll always have pressure on you. The further along in your career and life you go, the more pressure is likely to be on you. You have to "make" time for improvement and learning if it's a priority.

Working With Powershell Objects to Create Yaml

Who This Might Be For

  • PowerShellers wanting to know how to create json and yaml dynamically via pscustomobject.
  • Anyone wanting to create configs like Datadog or other tools dynamically without the benefit of a configuration management tool.
  • Anyone else wanting to fall asleep more quickly. (I can think of better material such as the Go spec docs, but hey, I can't argue with your good taste 😄)

YAML

It's readable.

It's probably cost all of us hours when debugging yaml that's nested several layers and an errant whitespace got in.

It's here to stay.

I prefer it over JSON for readability, but I prefer JSON for programmability.

Sometimes though, tooling uses yaml, and we need to be able to flip between both.

Historically I've used cfn-flip which is pretty great.

Enter yq

The problem I have with using cfn-flip is dependencies. It's a bit crazy to setup a docker image and then need to install a bunch of python setup tools to just get this one tool when it's all I need.

I thought about building a quick Go app to do this and give me the benefit of a single binary, as there is a pretty useful yaml package already. Instead, I found a robust package that is cross-platform called yq and it's my new go to. 🎉

Just plain works

The docs are great

Reading STDIN is a bit clunky, but not too bad, though I wish it would take more of a pipeline input approach natively. Instead of passing in {"string":"value"} | yq it requires you to specify stringinput | yq eval - --prettyPrint . Note the single hyphen after eval. This is what signifies that the input is STDIN.

Dynamically Generate Some Configs

I was working on some Datadog config generation for SQL Server, and found this tooling useful, especially on older Windows instances that didn't have the capability to run the nice module powershell-yaml.

Here's how to use PowerShell objects to help generate a yaml configuration file on demand.

Install

See install directions for linux/mac, as it's pretty straightforward.

For windows, the chocolatey package was outdated as of the time of the article using the version 3.x.

I used a PowerShell 4.0 compatible syntax here that should work on any instances with access to the web.

[Net.ServicePointManager]::SecurityProtocol = [Net.SecurityProtocolType]::Tls12
if (-not (Test-Path 'C:\tools\yq.exe' -PathType Leaf))
    {
        $ProgressPreference = 'SilentlyContinue'
        New-Item 'C:\tools' -ItemType Directory -Force
        Invoke-WebRequest 'https://github.com/mikefarah/yq/releases/download/v4.4.1/yq_windows_amd64.exe' -OutFile 'C:\tools\yq.exe' -UseBasicParsing
        Unblock-File 'C:\tools\yq.exe' -Confirm:$false
    }

Once this was downloaded, you could either make sure C:\tools was in PATH or just use the fully qualified path for our simple use case.

Get AWS Metadata

In AWS, I parsed the metadata for the AccountID and InstanceID to generate a query to pull the Name tag dynamically.

{{< admonition type="Tip" title="Permissions Check" >}} You must have the required permissions for the instance profile for this to work. This is not an instance level permission, so you'll want to add the required DescribeTags and ListInstances permissions for using a command such as Get-EC2Tag {{< /admonition >}}

Import-Module AWSPowershell -Verbose:$false *> $null
# AWSPowerShell is the legacy module, but is provided already on most AWS instances
$response = Invoke-RestMethod -Uri 'http://169.254.169.254/latest/dynamic/instance-identity/document' -TimeoutSec 5
$AccountId = $response.AccountId

Pull Back EC2 Tags

Now we can pull back the tag using an EC2 instance filter object.

$filters = @(
      [Amazon.EC2.Model.Filter]::new('resource-id', $response.InstanceId)
  )
  $tags = Get-EC2Tag -Filters $filters
  $tagcollection = $tags.ForEach{
      $t = $_
      [pscustomobject]@{
          Name  = $t.name
          Value = $t.value
      }
  }
  Write-Host "Tags For Instance: $($tagcollection | Format-Table -AutoSize -Wrap | Out-String)"
  $HostName = $Tags.GetEnumerator().Where{ $_.Key -eq 'Name' }.Value.ToLower().Trim()
  $SqlInstance = $HostName

Switch Things Up With A Switch

The next step was to alias the instance.

The better way to do this would be to use a tag that it reads, but for my quick ad-hoc use, this just let me specific an explicit alias to generate as a tag in the yaml. Again, try to use the Datadog tagging feature to do this automatically if possible.

{{< admonition type="Tip" title="Switch Statements" >}} If you aren't familiar with PowerShell's switch statement, it's a nice little feature for making this evaluation easy to read.

For the breadth of what this cool language feature can do, check this article out:

Everything you ever wanted to know about the switch statement {{< /admonition >}}

switch ($AccountId)
{
    '12345' { $AWSAccountAlias  = 'mydevenv' ; $stage = 'qa' }
    '12345' { $AWSAccountAlias  = 'myprodenv' ; $stage = 'prod' }
    default
    {
        throw "Couldn't match a valid account number to give this an alias"
    }
}

Now, preview the results of this Frankenstein.

Write-Host -ForegroundColor Green ("
`$HostName        = $HostName
`$SqlInstance     = $SqlInstance
`$AWSAccountAlias = $AWSAccountAlias
`$stage           = $stage
 ")

Ready To Generate Some Yaml Magic

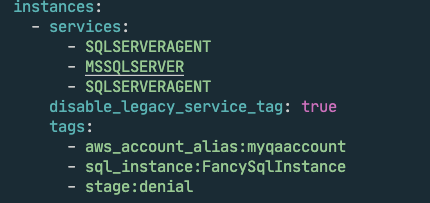
$TargetConfig = (Join-Path $ENV:ProgramData 'Datadog/conf.d/windows_service.d/conf.yaml')
$Services = [pscustomobject]@{
    'instances' = @(
        [ordered]@{
            'services'                   =  @(
                'SQLSERVERAGENT'
                'MSSQLSERVER'
                'SQLSERVERAGENT'
            )
            'disable_legacy_service_tag' = $true
            'tags'                       = @(
                "aws_account_alias:$AWSAccountAlias"
                "sql_instance:$SqlInstance"
                "stage:$stage"
            )
        }
    )
}

$Services | ConvertTo-Json -Depth 100 | &'C:\tools\yq.exe' eval - --prettyPrint | Out-File $TargetConfig -Encoding UTF8

This would produce a nice json output like this

Example config image

One More Complex Example

Start with creating an empty array and some variables to work with.

$UserName = 'TacoBear'
$Password = 'YouReallyThinkI''dPostThis?Funny'
$TargetConfig = (Join-Path $ENV:ProgramData 'Datadog/conf.d/sqlserver.d/conf.yaml')
$Queries = @()

Next include the generic Datadog collector definition.

This is straight outta their Github repo with the benefit of some tagging.

$Queries += [ordered]@{
    'host'      ='tcp:localhost,1433'
    'username'  =$UserName
    'password'  = $Password
    'connector' ='adodbapi'
    'driver'    = 'SQL Server'
    'database'  = 'master'
    'tags'      = @(
        "aws_account_alias:$AWSAccountAlias"
        "sql_instance:$SqlInstance"
        "stage:$stage"
    )
}

{{< admonition type="Tip" title="Using += for Collections" >}} Using += is a bit of an anti-pattern for high performance PowerShell, but it works great for something like this that's ad-hoc and needs to be simple. For high performance needs, try using something like $list = [Systems.Collections.Generic.List[pscustomobject]]:new() for example. This can then allow you to use the $list.Add([pscustomobject]@{} to add items.

A bit more complex, but very powerful and performance, with the benefit of stronger data typing. {{< /admonition >}}

This one is a good example of the custom query format that Datadog supports, but honestly I found pretty confusing in their docs until I bumbled my way through a few iterations.

$Queries +=    [ordered]@{
    # description: Not Used by Datadog, but helpful to reading the yaml, be kind to those folks!
    'description'             = 'Get Count of Databases on Server'
    'host'                    ='tcp:localhost,1433'
    'username'                = $UserName
    'database'                = 'master'
    'password'                = $Password
    'connector'               ='adodbapi'
    'driver'                  = 'SQL Server'
    'min_collection_interval' = [timespan]::FromHours(1).TotalSeconds
    'command_timeout'         = 120

    'custom_queries'          = @(
        [ordered]@{
            'query'   = "select count(name) from sys.databases as d where d.Name not in ('master', 'msdb', 'model', 'tempdb')"
            'columns' = @(
                [ordered]@{
                    'name' = 'instance.database_count'
                    'type' = 'gauge'
                    'tags' = @(
                        "aws_account_alias:$AWSAccountAlias"
                        "sql_instance:$SqlInstance"
                        "stage:$stage"
                    )
                }
            )
        }
    )
}

Let me do a quick breakdown, in case you aren't as familiar with this type of syntax in PowerShell.

  1. $Queries += takes whatever existing object we have and replaces it with the current object + the new object. This is why it's not performant for large scale work as it's basically creating a whole new copy of the collection with your new addition.
  2. Next, I'm using [ordered] instead of [pscustomobject] which in effect does the same thing, but ensures I'm not having all my properties randomly sorted each time. Makes things a little easier to review. This is a shorthand syntax for what would be a much longer tedious process using New-Object and Add-Member.
  3. Custom queries is a list, so I cast it with @() format, which tells PowerShell to expect a list. This helps json/yaml conversion be correct even if you have just a single entry. You can be more explicit if you want, like [pscustomobject[]]@() but since PowerShell ignores you mostly on trying to be type specific, it's not worth it. Don't try to make PowerShell be Go or C#. 😁

Flip To Yaml

Ok, we have an object list, now we need to flip this to yaml.

It's not as easy as $Queries | yq because of the difference in paradigm with .NET.

We are working with a structured object.

Just look at $Queries | Get-Member and you'll probably get: TypeName: System.Collections.Specialized.OrderedDictionary. The difference is that Go/Linux paradigm is focused on text, not objects. With powershell-yaml module you can run ConvertTo-Yaml $Queries and it will work as it will handle the object transformation.

However, we can actually get there with PowerShell, just need to think of a text focused paradigm instead. This is actually pretty easy using Converto-Json.

$SqlConfig = [ordered]@{'instances' = $Queries }
$SqlConfig | ConvertTo-Json -Depth 100 | &'C:\tools\yq.exe' eval - --prettyPrint | Out-File $TargetConfig -Encoding UTF8

This takes the object, converts to json uses the provided cmdlet from PowerShell that knows how to properly take the object and all the nested properties and magically split to JSON. Pass this into the yq executable, and behold, the magic is done.

You should have a nicely formatted yaml configuration file for Datadog.

If not, the dog will yip and complain with a bunch of red text in the log.

Debug Helper

Use this on the remote instance to simplify some debugging, or even connect via SSM directly.

& "$env:ProgramFiles\Datadog\Datadog Agent\bin\agent.exe" stopservice
& "$env:ProgramFiles\Datadog\Datadog Agent\bin\agent.exe" start-service

#Stream Logs without gui if remote session using:
Get-Content 'C:\ProgramData\Datadog\logs\agent.log' -Tail 5 -Wait

# interactive debugging and viewing of console
# & "$env:ProgramFiles\Datadog\Datadog Agent\bin\agent.exe" launch-gui

Wrap Up

Ideally, use Chef, Ansible, Saltstack, DSC, or another tool to do this. However, sometimes you just need some flexible options for generating this type of content dynamically. Hopefully, you'll find this useful in your PowerShell magician journey and save some time.

I've already found it useful in flipping json content for various tools back and forth. 🎉

A few scenarios that tooling like yq might prove useful could be:

  • convert simple query results from json to yaml and store in git as config
  • Flip an SSM Json doc to yaml
  • Review a complex json doc by flipping to yaml for more readable syntax
  • Confusing co-workers by flipping all their cloudformation from yaml to json or yaml from json. (If you take random advice like this and apply, you probably deserve the aftermath this would bring 🤣.)

Nativefier

{{< admonition type="Info" title="Update 2021-09-20" open="true">}} Updated with improved handling using public docker image. {{< /admonition >}} {{< admonition type="Info" title="Update 2021-05-10" open="true">}} Added additional context for setting internal-urls via command line. {{< /admonition >}}

{{< admonition type="Info" title="Update 2021-05-13" open="true">}} Added docker run commands to simplify local build and run without global install. {{< /admonition >}}

Ran across this app, and thought was kinda cool. I've had some issues with Chrome apps showing up correctly in certain macOS windows managers to switch context quickly.

Using this tool, you can generate a standalone electron app bundle to run a webpage in as it's own dedicated window.

It's cross-platform.

If you are using an app like Azure Boards that doesn't offer a native app, then this can provide a slightly improved experience over Chrome shortcut apps. You can pin this to your tray and treat it like a native app.

Docker Setup

{{< admonition type="Note" title="Optional - Build Locally" open=false >}} This step is no longer required per public docker image.

cd ~/git
gh repo clone nativefier/nativefier
cd nativefier
docker build -t local/nativefier .

{{< /admonition >}}

Docker Build

Highly recommend using docker for the build as it was by far the less complicated.

docker run --rm -v ~/nativefier-apps:/target/ local/nativefier:latest --help

$MYORG = 'foo'
$MYPROJECT = 'bar'
$AppName      = 'myappname'
$Platform = ''
switch -Wildcard ([System.Environment]::OSVersion.Platform)
{
    'Win32NT' { $Platform = 'windows' }
    'Unix'    {
                if ($PSVersionTable.OS -match 'Darwin')
                {
                    $Platform = 'darwin';
                    $DarkMode = '--darwin-dark-mode-support'
                }
                else
                {
                    $Platform = 'linux'
                }
            }
    default { Write-Warning 'No match found in switch' }
}
$InternalUrls = '(._?contacts\.google\.com._?|._?dev.azure.com_?|._?microsoft.com_?|._?login.microsoftonline.com_?|._?azure.com_?|._?vssps.visualstudio.com._?)'
$Url          = "https://dev.azure.com/$MYORG/$MYPROJECT/_sprints/directory?fullScreen=true/"

$HomeDir = "${ENV:HOME}${ENV:USERPROFILE}" # cross platform support
$PublishDirectory = Join-Path "${ENV:HOME}${ENV:USERPROFILE}" 'nativefier-apps'
$PublishAppDirectory = Join-Path $PublishDirectory "$AppName-$Platform-x64"

Remove-Item -LiteralPath $PublishAppDirectory -Recurse -Force
docker run --rm -v  $HomeDir/nativefier-apps:/target/ nativefier/nativefier:latest --name $AppName --platform $Platform $DarkMode --internal-urls $InternalUrls $Url /target/

Running The CLI

For a site like Azure DevOps, you can run:

$MYORG = 'foo'
$MYPROJECT = 'bar'
$BOARDNAME = 'bored'
nativefier --name 'board' https://dev.azure.com/$MYORG/$MYPROJECT/_boards/board/t/$BOARDNAME/Backlog%20items/?fullScreen=true ~/$BOARDNAME

Here's another example using more custom options to enable internal url authentication and setup an app for a sprint board.

nativefier --name "sprint-board" --darwin-dark-mode-support `
  --internal-urls '(._?contacts.google.com._?|._?dev.azure.com_?|._?microsoft.com_?|._?login.microsoftonline.com_?|._?azure.com_?|._?vssps.visualstudio.com._?)' `
  "https://dev.azure.com/$MYORG/$MYPROJECT/_sprints/directory?fullScreen=true"
  ` ~/sprint-board

If redirects for permissions occur due to external links opening, you might have to open the application bundle and edit the url mapping. GitHub Issue #706 This can be done proactively in the --internal-urls command line argument shown earlier to bypass the need to do this later.

/Users/$(whoami)/$BOARDNAME/APP-darwin-x64/$BOARDNAME.app/Contents/Resources/app/nativefier.json

Ensure your external urls match the redirect paths that you need such as below. I included the standard oauth redirect locations that Google, Azure DevOps, and Microsoft uses. Add your own such as github to this to have those links open inside the app and not in a new window that fails to recieve the postback.

"internalUrls": "(._?contacts\.google\.com._?|._?dev.azure.com_?|._?microsoft.com_?|._?login.microsoftonline.com_?|._?azure.com_?|._?vssps.visualstudio.com._?)",

Go R1 Day 27

progress

  • Iterated through AWS SDK v1 S3 buckets to process IAM policy permissions.
  • Unmarshaled policy doc into struct using Json-To-Struct.

Github Pages Now Supports Private Pages

I'm a huge static site fan (lookup jamstack).

What I've historically had a problem with was hosting. For public pages, it's great.

For private internal docs, it's been problematic. It's more servers and access control to manage if you want something for a specific group inside a company to access.

This new update is a big deal for those that want to provide an internal hugo, jekyll, mkdocs, or other static generate based documentation site for their team.

Access control for GitHub Pages - GitHub Changelog

Ensuring Profile Environment Variables Available to Intellij

Open IntelliJ via terminal: open "/Users/$(whoami)/Applications/JetBrains Toolbox/IntelliJ IDEA Ultimate.app"

This will ensure your .profile, .bashrc, and other profile settings that might be loading some default environment variables are available to your IDE. For macOS, you'd have to set in the environment.plist otherwise to ensure they are available to a normal application.

ref: OSX shell environment variables – IDEs Support (IntelliJ Platform) | JetBrains

Create an S3 Lifecycle Policy with PowerShell

First, I'm a big believer in doing infrastructure as code.

Using the AWS SDK with any library is great, but for things like S3 I'd highly recommend you use a Terraform module such as Cloudposse terraform-aws-s3-bucket module. Everything Cloudposse produces has great quality, flexibility with naming conventions, and more.

Now that this disclaimer is out of the way, I've run into scenarios where you can have a bucket with a large amount of data such as databases which would be good to do some cleanup on before you migrate to newly managed backups.

In my case, I've run into 50TB of old backups due to tooling issues that prevented cleanup from being successful. The backup tooling stored a sqlite database in one subdirectory and in another directory the actual backups.

I preferred at this point to only perform the lifecycle cleanup on the backup files, while leaving the sqlite file alone. (side note: i always feel strange typing sqlite, like I'm skipping an l 😁).

Here's an example of how to do this from the AWS PowerShell docs.

I modified this example to support providing multiple key prefixes. What wasn't quite clear when I did this the need to create the entire lifecycle policy collection as a single object and pass this to the command.

If you try to run a loop and create one lifecycle policy for each Write-S3LifecycleConfiguration command, it only kept what last ran. Instead, ensure you create the entire object as shown in the example, and then you'll be able to have multiple lifecycle policies get attached to your bucket.

Good luck!

Leverage Renovate for Easy Dependency Updates

{{< admonition type="Note" title="Update 2021-06-30" open="true">}}

Added example from renovate documentation with some notes on the Azure DevOps Pipeline to leverage their free renovate service. GitHub users benefit from the Renovate app, but Azure Pipelines should use an Azure Pipeline definition.

Follow the instructions from the Renovate Me task linked in resources, and ensure the appropriate rights are granted for the build service to manage branches and pull requests.

{{< /admonition >}}

Renovate is a great tool to know about. For Go, you can keep modules updated automatically, but still leverage a pull request review process to allow automated checks to run before allowing the update.

This is particularly useful with Terraform dependencies, which I consider notoriously difficult to keep updated. Instead of needing to use ranges for modules, you can start specifying exact versions and this GitHub app will automatically check for updates periodically and submit version bumps.

Why? You can have a Terraform plan previewed and checked for any errors on a new version update with no work. This means your blast radius on updates would be reduced as you are staying up to date and previewing each update as it's available.

No more 5 months of updates and figuring out what went wrong 😁

Here's an example json config that shows how to allow automerging, while respecting minor/major version updates not enabling automerge.

Note that you'd want to install the auto-approver app they document in the marketplace if you have pull request reviews required.

In addition, if you use CODEOWNERS file, this will still block automerge. Consider removing that if you aren't really leveraging it.

Resources

Go R1 Day 26

Progress

  • Evaluated gorm usage best practices with Slack Gopher community.
  • Obtained a great example to get me started on go routine and channels usage with multi-database queries.